ラズベリーパイPico WとモータドライバでDCモータを動かしてみよう
ラズベリーパイPico WでDCモータを動かしてみます。
DCモータについてはマイクロビットとモータドライバでDCモータを動かしてみようをご覧ください。
ラズベリーパイPico WでDCモータを動かす時もモータドライバを利用します。
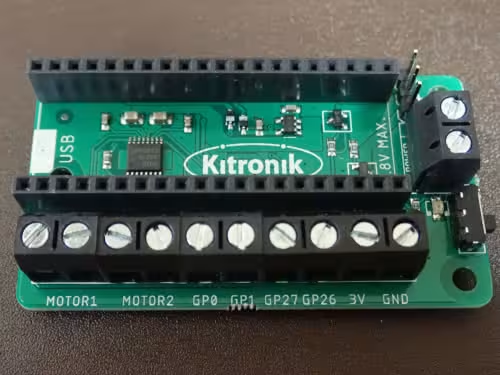
今回はKitronik製のRaspberry Pi Pico用モータードライバ基板 を利用します。
Raspberry Pi Pico用モータードライバ基板 — スイッチサイエンス
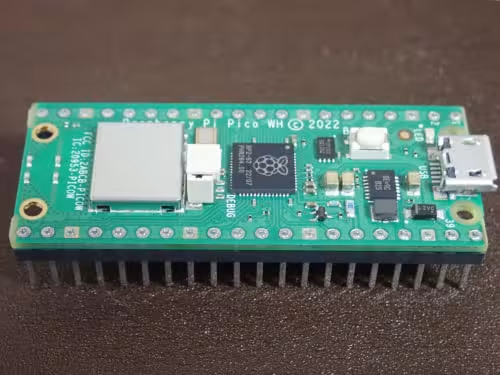
ラズベリーパイPico WHを購入し、
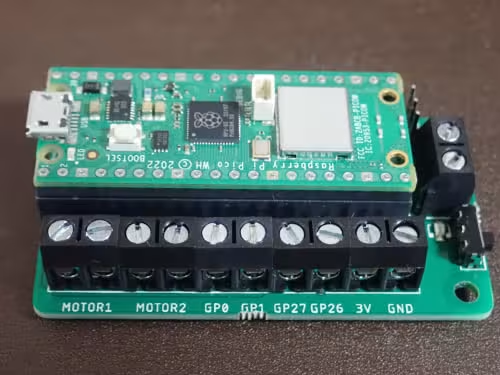
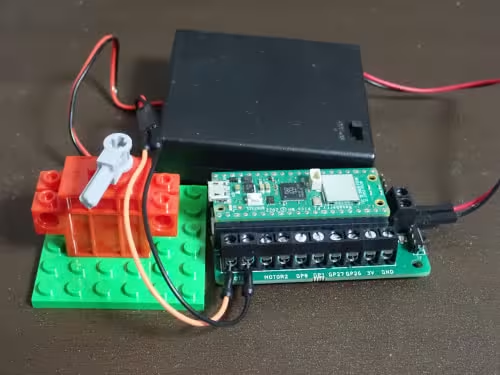
このようにラズベリーパイPico Wをモータードライバと接続して使用します。
一度モータードライバと繋げたら、ラズベリーパイPico Wを外すのは難しいので、モータドライバ専用のラズベリーパイPico Wを購入することをおすすめします。
上記の内容を踏まえて、今回使用するものを挙げます。
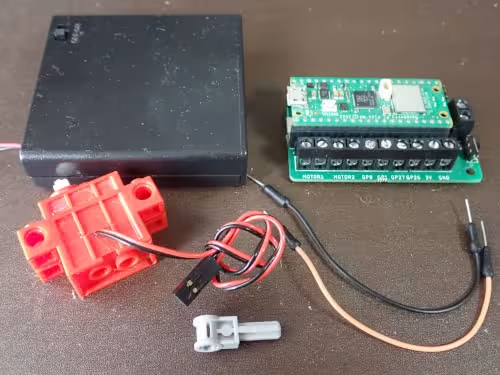
ラズベリーパイPico W + モータドライバ × 1
GeekServo 9G Motor-Red × 1
GeekServo 9G Motor-Red — スイッチサイエンス
単三電池2本 スイッチ付き電池ボックス × 1
単三電池2本 スイッチ付き電池ボックス — スイッチサイエンス
ジャンパワイヤ(オス〜オス) × 2
単三電池 × 2
※上の写真では単三電池 × 4のものを使用しています
※今回のコードでDCモータの動作が悪かった時は単三電池 × 4を試してみましょう
上記の各パーツを
のように繋ぎます。
※繋ぎ方は上記のマイクロビットとモータドライバでDCモータを動かしてみようと同様の方法になります。
それでは早速コードを書いてみます。
ラズベリーパイPico Wではライブラリを読み込んでコードを作成するのが簡単なので、モータドライバ用のクラスを利用することにします。
下記URLを開き、エディタ(Thonny)にコードをペーストしPicoMotorDriver.pyというファイル名でラズベリーパイPico Wに保存します。
一応必要箇所を転機しておきます。
import machine
import utime

class KitronikPicoMotor:

    def motorOn(self,motor, direction, speed):
        #cap speed to 0-100%
        if (speed<0):
            speed = 0
        elif (speed>100):
            speed=100
        #convert 0-100 to 0-65535
        PWM = int(speed*655.35)
        if motor == 1:
            if direction == "f":
                self.motor1Forward.duty_u16(PWM)
                self.motor1Reverse.duty_u16(0)
            elif direction == "r":
                self.motor1Forward.duty_u16(0)
                self.motor1Reverse.duty_u16(PWM)
            else:
                raise Exception("INVALID DIRECTION") #harsh, but at least you'll know
        elif motor == 2:
            if direction == "f":
                self.motor2Forward.duty_u16(PWM)
                self.motor2Reverse.duty_u16(0)
            elif direction == "r":
                self.motor2Forward.duty_u16(0)
                self.motor2Reverse.duty_u16(PWM)
            else:
                raise Exception("INVALID DIRECTION") #harsh, but at least you'll know
        else:
            raise Exception("INVALID MOTOR") #harsh, but at least you'll know
    #To turn off set the speed to 0...
    def motorOff(self,motor):
        self.motorOn(motor,"f",0)

    def step(self,direction, steps, speed =20, holdPosition=False):

        if(direction =="f"):
            directions = ["f", "r"]
            coils = [1,2]
        elif (direction == "r"):
            directions = ["r", "f"]
            coils = [2,1]
        else:
            raise Exception("INVALID DIRECTION") #harsh, but at least you'll know
        while steps > 0:
            for direction in directions:
                if(steps == 0):
                    break
                for coil in coils:
                    self.motorOn(coil,direction,100)
                    utime.sleep_ms(speed)
                    steps -=1
                    if(steps == 0):
                        break
    #to save power turn off the coils once we have finished.
    #this means the motor wont hold position.
        if(holdPosition == False):
            for coil in coils:
                self.motorOff(coil)

    #Step an angle. this is limited by the step resolution - so 200 steps is 1.8 degrees per step for instance.
    # a request for 20 degrees with 200 steps/rev will result in 11 steps - or 19.8 rather than 20.
    def stepAngle(self, direction, angle, speed =20, holdPosition=False, stepsPerRev=200):
        steps = int(angle/(360/stepsPerRev))
        print (steps)
        self.step(direction, steps, speed, holdPosition)


    #initialisation code for using:
    #defaults to the standard pins and freq for the kitronik board, but could be overridden
    def __init__(self,Motor1ForwardPin = machine.Pin(3),Motor1ReversePin = machine.Pin(2),Motor2ForwardPin = machine.Pin(6),Motor2ReversePin = machine.Pin(7),PWMFreq = 10000):
        self.motor1Forward=machine.PWM(Motor1ForwardPin)
        self.motor1Reverse=machine.PWM(Motor1ReversePin)
        self.motor2Forward=machine.PWM(Motor2ForwardPin)
        self.motor2Reverse=machine.PWM(Motor2ReversePin)
        self.motor1Forward.freq(PWMFreq)
        self.motor1Reverse.freq(PWMFreq)
        self.motor2Forward.freq(PWMFreq)
        self.motor2Reverse.freq(PWMFreq)
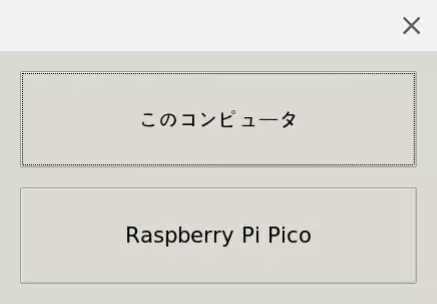
コードを保存する時は、Raspberry Pi Picoの方を選択して、マイコン内に直接保存します。
続いて、main.pyを作成します。
main.py
import PicoMotorDriver
import time

speed = 80

board = PicoMotorDriver.KitronikPicoMotor()
board.motorOff(1)

# 動作確認
board.motorOn(1, "f", speed)
time.sleep(2)
board.motorOn(1, "r", speed)
time.sleep(2)
board.motorOff(1)
今回はモータをforward(前進:時計回り)で2秒動かし、reverse(後進:半時計回り)で2秒動かした後に止めるという動作にしています。
コードを実行してみると、
のようになります。
- ラズベリーパイPico Wを使ってみる
- ラズベリーパイPico Wを初期化する
- ラズベリーパイPico WでHTTPリクエストを送信してみる
- ラズベリーパイPico WでHTTPのPOSTで値を送信してみる
- ラズベリーパイPico WでHTTPのサーバを構築してみる
- ラズベリーパイPico WでHTTPリクエストでLEDを点灯できるようにしてみる
- AndroidでラズベリーパイPico WからのHTTPリクエストを受信する
- ラズベリーパイPico WでBluetoothを使ってみる
- PythonでSerial Bluetooth Terminalの動作を再現してみる
- ラズベリーパイPico WでBluetoothのセントラル機器を構築してみる
- ラズベリーパイPico WでBluetooth接続を介してLチカをしてみる
- ラズベリーパイPico W同士をBluetooth接続してLチカをしてみる
- ラズベリーパイPico WとモータドライバでDCモータを動かしてみよう
- ラズベリーパイPico Wを介してブルートゥースでDCモータを制御してみよう
- ラズベリーパイPico W同士をブルートゥースで接続してDCモータを制御してみよう
- ラズベリーパイPico Wで270°サーボモータを動かしてみよう
- クロームブックでラズベリーパイとファイルの共有を行う
- シリアルコンソール経由でラズベリーパイを操作する
- LANケーブル経由でラズベリーパイを操作する
- クロームブックでFTP操作の代替のファイルアプリにマウントを利用する
- クロームブックでSFTPでファイルの転送を行う
- クロームブックで公開鍵認証でラズベリーパイにリモートアクセスする
- ラズベリーパイゼロ2W
- ラズベリーパイのスワップを変更する