カスタムフィールドの拡張ポイントを介して、記事投稿画面にカスタムフィールドのフォームを設置してみます。
今回のコードはプラグインIDがplugin_customfieldのプラグインで話を進めます。
/CMSインストールディレクトリ/common/site_include/plugin/plugin_customfield/plugin_customfield.php
<?php
class PluginCustomfieldPlugin{
const PLUGIN_ID = "plugin_customfield";
function getId(){
return self::PLUGIN_ID;
}
function init(){
CMSPlugin::addPluginMenu(self::PLUGIN_ID,array(
"name" => "プラグインのカスタムフィールドサンプル",
"type" => Plugin::TYPE_NONE,
"description" => "",
"author" => "",
"url" => "",
"mail" => "",
"version" => "1.0"
));
// 当プラグインが有効であるかを調べる
if(CMSPlugin::activeCheck(self::PLUGIN_ID)){
if(defined("_SITE_ROOT_")){
// 公開側ページの方で動作する拡張ポイントで使用したいものを追加する
}else{
// 管理画面側の方で動作する拡張ポイントで使用したいものを追加する
/**
* 記事投稿画面にフォームを表示する
* 注) 記事投稿画面とブログページ毎の記事投稿画面で分かれる
* →記事IDの取得方法が異なる為
*/
CMSPlugin::addCustomFiledFunction(self::PLUGIN_ID, "Entry.Detail", array($this, "onCallCustomField"));
CMSPlugin::addCustomFiledFunction(self::PLUGIN_ID, "Blog.Entry", array($this, "onCallCustomField_onBlog"));
}
}
}
// 記事投稿画面用
function onCallCustomField(){
$arg = SOY2PageController::getArguments();
$entryId = (isset($arg[0])) ? (int)$arg[0] : 0;
return self::_buildCommonForm($entryId);
}
// 各ブログページからの記事投稿画面用
function onCallCustomField_onBlog(){
$arg = SOY2PageController::getArguments();
// 記事IDの取得時の配列のインデックスの指定に注意
$entryId = (isset($arg[1])) ? (int)$arg[1] : 0;
return self::_buildCommonForm($entryId);
}
/**
* カスタムフィールドの共通箇所
* @param int
* @return html
*/
private function _buildCommonForm(int $entryId){
// PHPで直接出力
return <<<HTML
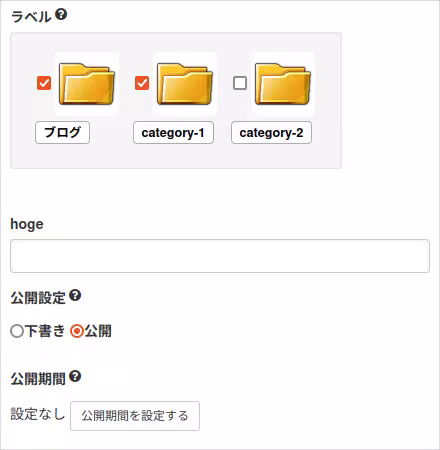
<div class="form-group">
<label>hoge</label>
<input type="text" class="form-control">
</div>
HTML;
}
public static function register(){
$obj = CMSPlugin::loadPluginConfig(self::PLUGIN_ID);
if(!$obj) $obj = new PluginCustomfieldPlugin();
CMSPlugin::addPlugin(self::PLUGIN_ID, array($obj, "init"));
}
}
PluginCustomfieldPlugin::register();
initメソッドの管理画面側の方の処理にCMSPlugin::addCustomFiledFunctionメソッドでフォーム登録用のメソッドを追加しておきます。
ここでの注意はSOY CMSの記事投稿画面は、記事管理と各ブログページからの記事投稿の二箇所があり、プラグインの方でもどちら(もしくは両方)の投稿画面に設置するかを明示的に指定する必要があります。
各々で追加したカスタムフィールドのフォーム用のメソッドで文字列を返すと、記事投稿画面の下の方に指定のHTMLが出力されるようになります。
今回のサンプルコードでは、記事管理とブログページからの記事投稿の両方で同じフォームにするので、共通の_buildCommonFormメソッドでフォームのHTMLを組み立てます。
上のサンプルではHTMLをヒアドキュメントで記載していますが、後にデータベース操作が入るとPHPでHTMLの直接記述は大変になってきますので、SOY2HTMLを介してフォームのHTMLを出力するようにします。
https://github.com/inunosinsi/SOY2/tree/master/SOY2HTML
_buildCommonFormメソッドを下記のように書き換えます。
private function _buildCommonForm(int $entryId){
	// SOY2HTML経由
	SOY2::import("site_include.plugin.plugin_customfield.form.PluginCustomfieldSamplePage");
	$form = SOY2HTMLFactory::createInstance("PluginCustomfieldSamplePage");
	$form->setEntryId($entryId);
	$form->execute();
	return $form->getObject();
}
下記2つのファイルも追加します。
/CMSインストールディレクトリ/common/site_include/plugin/plugin_customfield/config/form/PluginCustomfieldSamplePage.class.php
/CMSインストールディレクトリ/common/site_include/plugin/plugin_customfield/config/form/PluginCustomfieldSamplePage.html
2ファイルを下記のように編集します。
/CMSインストールディレクトリ/common/site_include/plugin/plugin_customfield/config/form/PluginCustomfieldSamplePage.class.php
<?php

class PluginCustomfieldSamplePage extends WebPage {

	private $entryId;

	function __construct(){}

	function execute(){
		parent::__construct();
	}

	function setEntryId($entryId){
		$this->entryId = $entryId;
	}
}
/CMSインストールディレクトリ/common/site_include/plugin/plugin_customfield/config/form/PluginCustomfieldSamplePage.html
<div class="form-group">
	<label>hoge</label>
	<input type="text" class="form-control">
</div>
これでPHPのヒアドキュメントからSOY2HTMLに切り替える事が出来ました。
今回のコードは下記のURLにサンプルコードがあります。
https://github.com/inunosinsi/soycms/tree/master/cms/common/site_include/plugin/plugin_customfield