一つのサーバで複数のドメインのサイトを運営する事になったので、その時に対応したメモを残す。
具体的にどのような構成であるか?を整理しておくと、
example.kyotoとother.example.kyotoという2つのドメインがあり、全く異なるテーマのサイトを一つのサーバで一つのSOY CMSで運営する。
利用しているサービス等
・サーバ:さくらのVPS 512プラン
・OS:Ubuntu 19.10
・ドメイン:お名前.comで管理
・SSL証明書:Let's Encrypt
今回の作業は既にLet's Encryptでexample.kyotoで証明書を発行しているものとする。
ブラウザでhttps://other.example.kyotoでアクセスできるようにするためには、example.kyotoのSSL証明書をワイルドカードで取得する必要がある。
上記の内容を加味した上で、これから実際に行った作業を記載する。
SSL証明書の取得等の作業は下記の記事等に記載されている方法で行っている。
ApacheでLet's Encryptの自動更新する為にCertBotを導入した
今回の話は、既にother.example.kyotoのDSN設定でAレコードでIPアドレスの指定が終わっているものとします。
既に登録しているSSL証明書の失効
下記のコマンドを実行する
$ sudo certbot delete -d example.kyoto
Which certificate(s) would you like to delete?
- - - - - - - - - - - - - - - - - - - - - - - - - - - - - - - - - - - - - - - -
1: example.kyoto
- - - - - - - - - - - - - - - - - - - - - - - - - - - - - - - - - - - - - - - -
Select the appropriate numbers separated by commas and/or spaces, or leave input
blank to select all options shown (Enter 'c' to cancel):
失効の候補が出力されたら、Enterをクリックして処理を開始する。
- - - - - - - - - - - - - - - - - - - - - - - - - - - - - - - - - - - - - - - -
Deleted all files relating to certificate example.kyoto.
- - - - - - - - - - - - - - - - - - - - - - - - - - - - - - - - - - - - - - - -
上記が表示されたら、下記のコマンドを実行して、一旦https://example.kyotoでアクセス出来ないようにする。
$ sudo a2dissite 000-default-le-ssl
$ sudo /etc/init.d/apache2 restart
example.kyotoのワイルドカードのSSL証明書を取得
下記のコマンドを実行する。
$ sudo certbot certonly --server https://acme-v02.api.letsencrypt.org/directory --manual --preferred-challenges dns -d *.example.kyoto -d example.kyoto
※ワイルドカードの証明書の取得なので、-d example.kyotoのオプションはいらないかも
表示された英文に従い、手続きを進めた後で、
- - - - - - - - - - - - - - - - - - - - - - - - - - - - - - - - - - - - - - - -
Please deploy a DNS TXT record under the name
_acme-challenge.example.kyoto with the following value:

##TXT用のランダム?な文字列##

Before continuing, verify the record is deployed.
- - - - - - - - - - - - - - - - - - - - - - - - - - - - - - - - - - - - - - - -
上記の内容が出力されたら、次はお名前.comの方での作業になる。
お名前.comのログイン後の画面のDNSレコード設定の画面で、
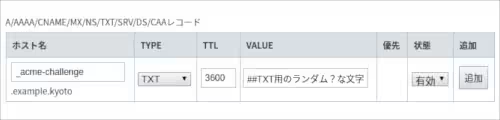
ホスト名の入力フォームを「_acme-challenge」
TYPEを「TXT」
TTLを「3600」
VALUEを「##TXT用のランダム?な文字列##」
→サーバ毎にTXT用の文字列は異なります
にして追加ボタンを押した後、設定を更新します。
数分待った後にお名前.comからメールが送信されてくるらしいので、受信を確認したら端末に戻り、
※代理で設定をしたのでメールの送信は確認できていない。
端末の方に戻り、Enterボタンを押す。
Waiting for verification...
Cleaning up challenges

IMPORTANT NOTES:
 - Congratulations! Your certificate and chain have been saved at:
   /etc/letsencrypt/live/example.kyoto/fullchain.pem
   Your key file has been saved at:
   /etc/letsencrypt/live/example.kyoto/privkey.pem
   Your cert will expire on 2020-06-05. To obtain a new or tweaked
   version of this certificate in the future, simply run certbot
   again. To non-interactively renew *all* of your certificates, run
   "certbot renew"
 - If you like Certbot, please consider supporting our work by:

   Donating to ISRG / Let's Encrypt:   https://letsencrypt.org/donate
   Donating to EFF:                    https://eff.org/donate-le
Congratulations!と出力されたら設定は終了。
Apacheを下記のコマンドで再起動しておく。
$ sudo a2ensite 000-default-le-ssl
$ sudo /etc/init.d/apache2 restart
SOY CMS側で一つのサーバ、一つのSOY CMSで複数のドメインのサイトを運営する設定
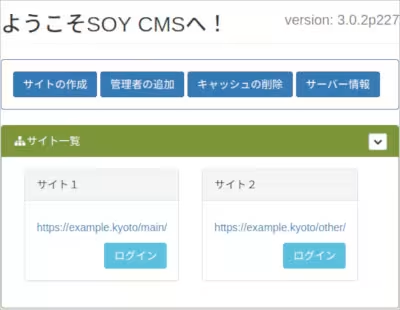
SOY CMSの管理画面を開き、サイトを2つ作成します。
これからサイト1(https://example.kyoto/main/)をhttps://example.kyotoで開けるようにし、
サイト2(https://example.kyoto/other/)をhttps://other.example.kyotoで開けるように設定することを予定して話を進めます。
ようこそSOY CMSへ!のページのサイドナビにあるサイト一覧を開き、サイト1の方のサイト詳細を開く。
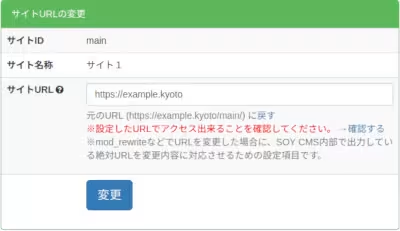
サイトURLの入力フォームに「https://example.kyoto」と入力して設定を変更する。
同様にサイト2でも
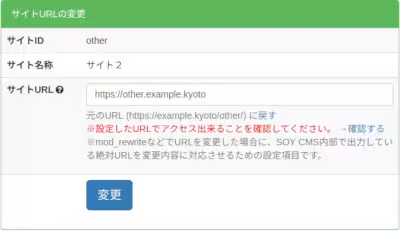
サイトURLを「https://other.example.kyoto」として設定を変更する。
2つのサイトのどちらもルート設定をせずにそのままにしておいた状態で、端末を開き下記の対応を行う。
※以後の説明はApache2のドキュメントルートを/var/www/htmlとして話を進める。
$ cd /var/www/html
$ nano index.php
index.phpを下記のようにして保存する。
<?php

if(strpos($_SERVER["SERVER_NAME"], "other") !== false){
        include_once("other/index.php");
}else{
        include_once("main/index.php");
}
続いて、.htaccessの方も作成する。
$ nano .htaccess
RewriteEngine on

RewriteCond %{HTTPS} off
RewriteRule ^(.*)$ https://%{HTTP_HOST}%{REQUEST_URI} [R,L]

RewriteCond %{REQUEST_FILENAME} !-f
RewriteCond %{DOCUMENT_ROOT}/main%{REQUEST_URI} -f [OR]
RewriteCond %{DOCUMENT_ROOT}main%{REQUEST_URI} -f
RewriteRule ^(.*)$ /main/$1 [L]

RewriteCond %{HTTP_HOST} ^other\.example\.kyoto
RewriteCond %{REQUEST_FILENAME} !-f
RewriteCond %{DOCUMENT_ROOT}/other%{REQUEST_URI} -f [OR]
RewriteCond %{DOCUMENT_ROOT}other%{REQUEST_URI} -f
RewriteRule ^(.*)$ /other/$1 [L]


RewriteCond %{REQUEST_FILENAME} !-f
RewriteCond %{REQUEST_FILENAME}/index.php !-f
RewriteCond %{REQUEST_FILENAME}/index.html !-f
RewriteCond %{REQUEST_FILENAME}/index.htm !-f
RewriteCond %{REQUEST_URI} !^/server-status
RewriteCond %{REQUEST_URI} !^/server-info
RewriteCond %{REQUEST_URI} !^/index.php/
RewriteRule ^(.*)$ index.php/$1 [L]
これですべての設定は終了。
Let's Encryptのワイルドカードの証明書の更新は毎回TXTレコードの値の更新があるので、既存の仕組みでは3月毎の自動更新が出来ない。
利用しているDNSによってはTXTレコードを自動で更新できる仕組みがあるので、この仕組みと組み合わせることでワイルドカードの証明書の自動更新ができるらしいが、お名前.comでこのような仕組みが見当たらず…
さくらのクラウドのオプションにあるDNSに移管すれば、自動更新がイケるようになるっぽい。
3ヶ月毎の更新は手動でやるか…